Overview
Microsoft will retire Basic Authentication for Exchange Online SMTP on October 1st, 2025. After that, ACRM will need to use modern authentication to continue sending email through Office 365.
On 15th April 2025, the ACRM Development team released a new feature for CRM.Web 15.24.0 - SMTP with OAuth 2.0 for Office 365
This guide will help you to configure SMTP with OAuth 2.0 to ensure uninterrupted email delivery in Office 365 environments.
ACRM supports three methods for sending email
-
MAPI:
-
Launches the user's desktop email client (e.g., Outlook) with a pre-filled message. The user sends it manually.
-
-
Exchange Web Services (EWS):
-
Used to sync emails and contacts, optionally calendar entries. Also supports email sending in ACRM Web.
This functionality is not affected by the change.
-
-
SMTP:
-
Basic Auth: Still supported for on-prem or third-party SMTP servers.
Will stop working with Exchange Online after the deadline. -
OAuth 2.0 (client credentials): Required for Exchange Online.
Supported starting in Aurea CRM 15.24.
-
Prerequisites
Before You Begin, ensure you have:
-
Aurea CRM version 15.24 or newer, required for OAuth2 SMTP support.
-
At least one licensed Exchange Online mailbox for sending emails.
-
Administrative access to Microsoft Entra (Azure AD) for app registration.
-
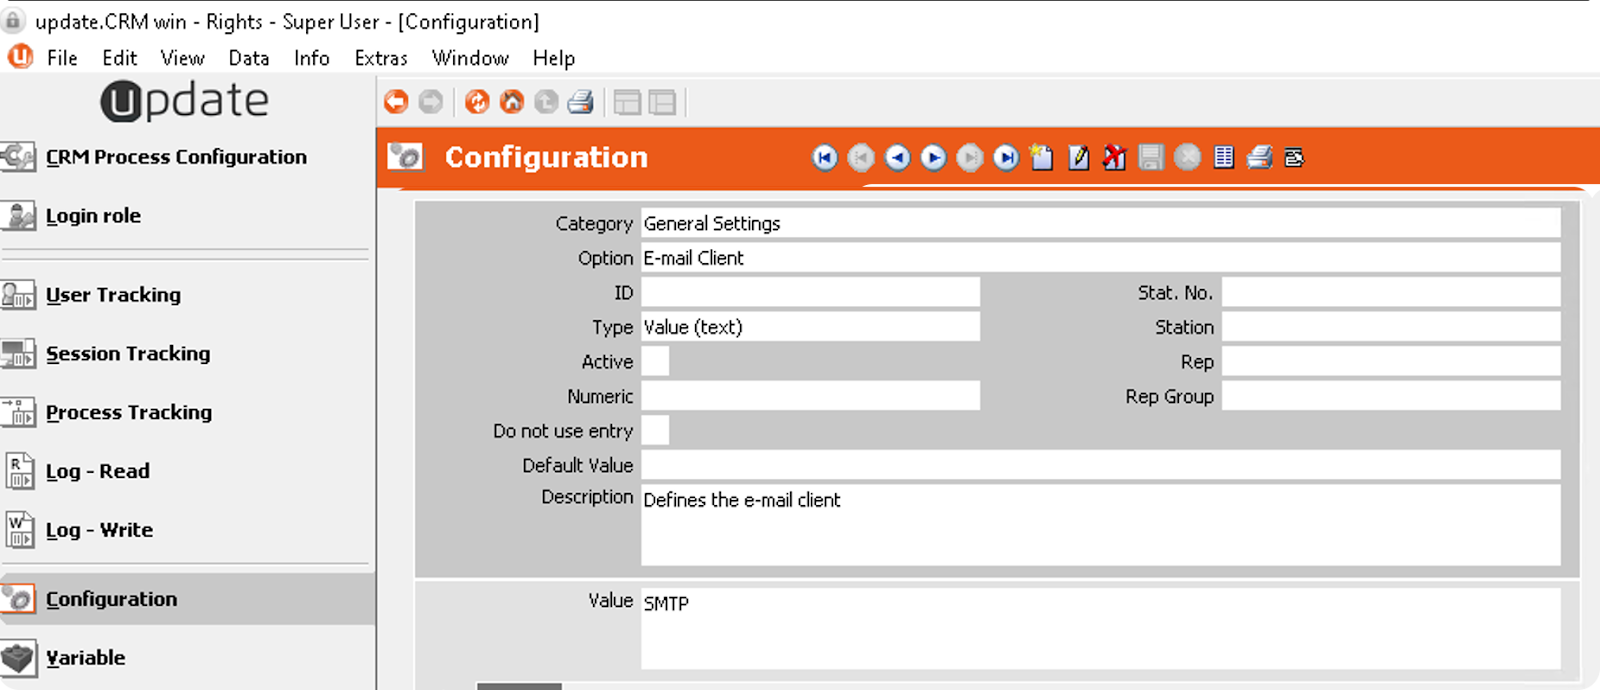
SMTP enabled in Aurea CRM (instead of MAPI).
Enable via: Rights Module → Configuration → General Settings → E-mail Client → SMTP.
Choosing the Right SMTP OAuth Setup
|
Scenario |
CRM Web |
CRM Win |
Pros |
Cons |
|
Single sender for all users(recommended for CRM Win) |
❌ Not supported. The sender is always the logged-in user. |
✅ Supported by copying a configured smtp.cfg to the system folder. |
Simple setup and minimal permissions (CRM Win only) |
Not possible in CRM Web. |
|
Multiple senders (per-user) |
✅ Default behavior — uses logged-in user's mailbox. |
✅ Default behavior. The SMTP settings screen saves smtp.cfg in the user’s folder. |
Emails are sent from each user’s own address |
Requires mailbox access and setup for each user |
Microsoft Entra (Azure AD) Setup Steps
Step 1: Register a New Application in Azure AD
-
Go to Microsoft Entra.
-
Navigate: Identity → Applications → App registrations
-
Click New registration.
-
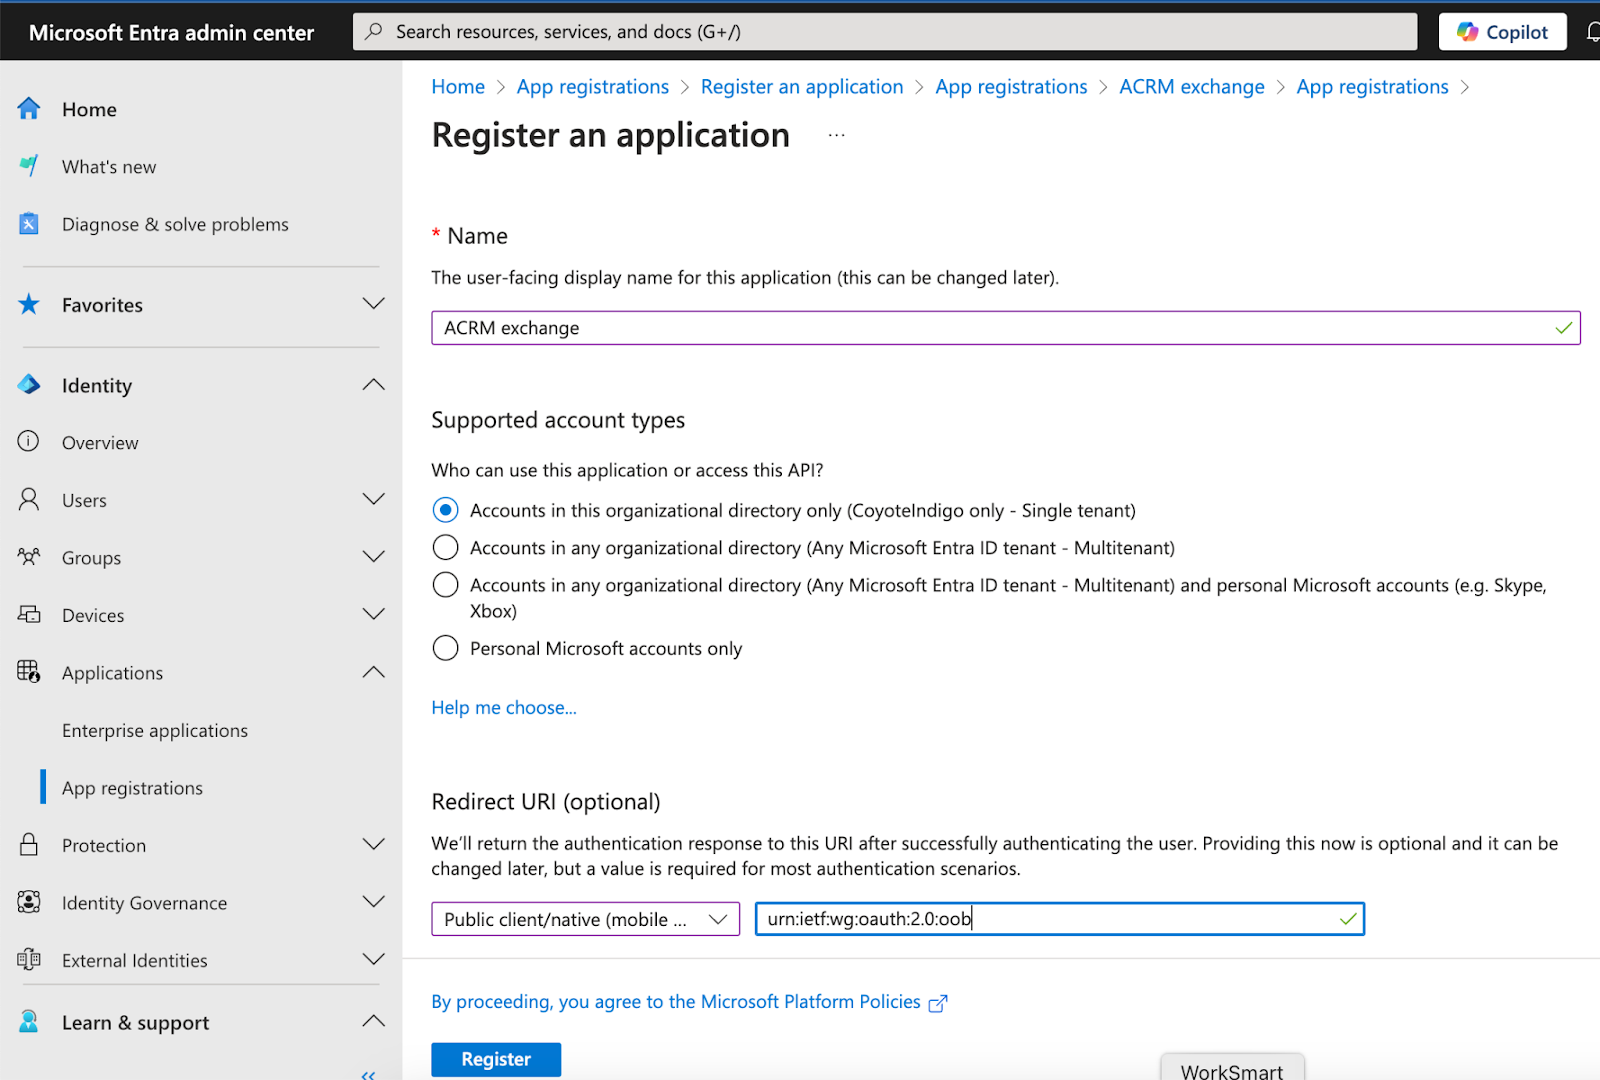
On the Register an application page, fill in the following details:
-
Name: Enter a name for your application.
-
Supported account types: Choose one:
-
Single Tenant
-
Multitenant
-
-
Redirect URL: Change the dropdown to Public client (mobile & desktop) and set the value to urn:ietf:wg:oauth:2.0:oob
-
-
Click Register.
-
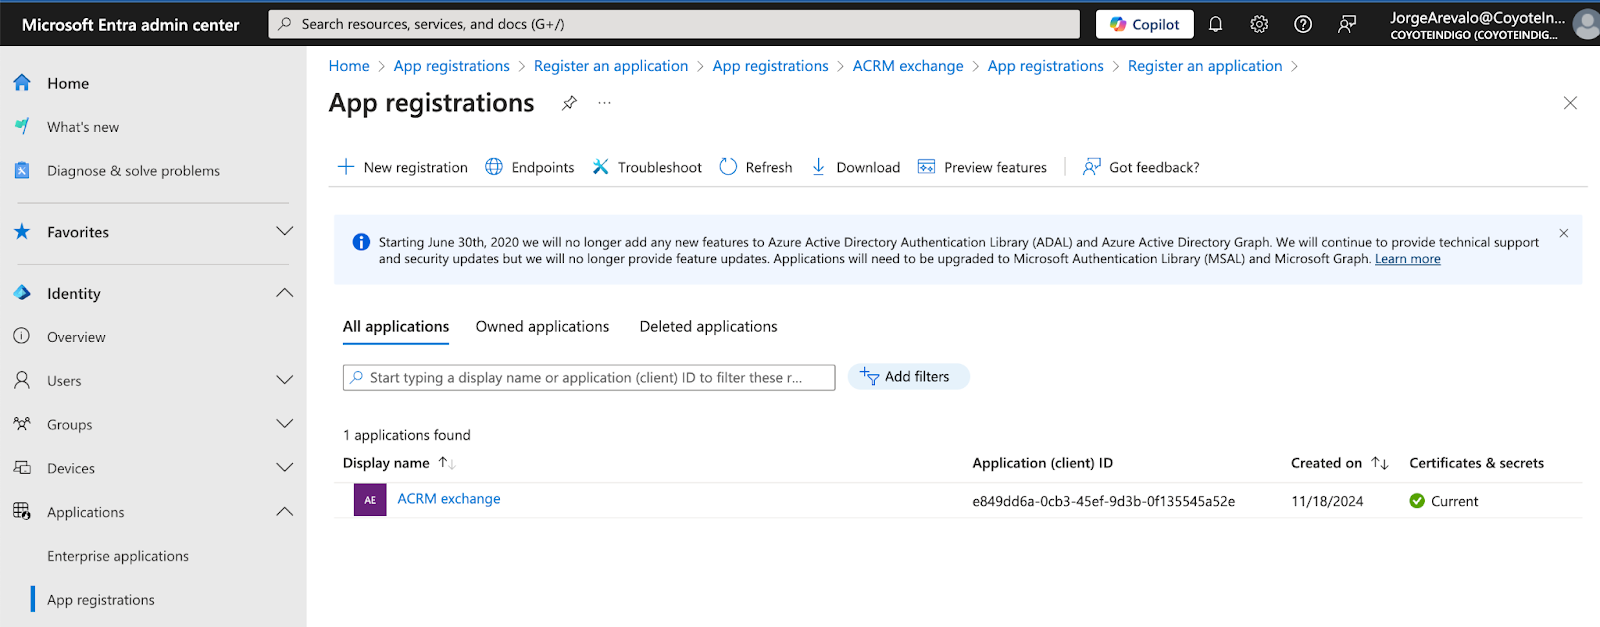
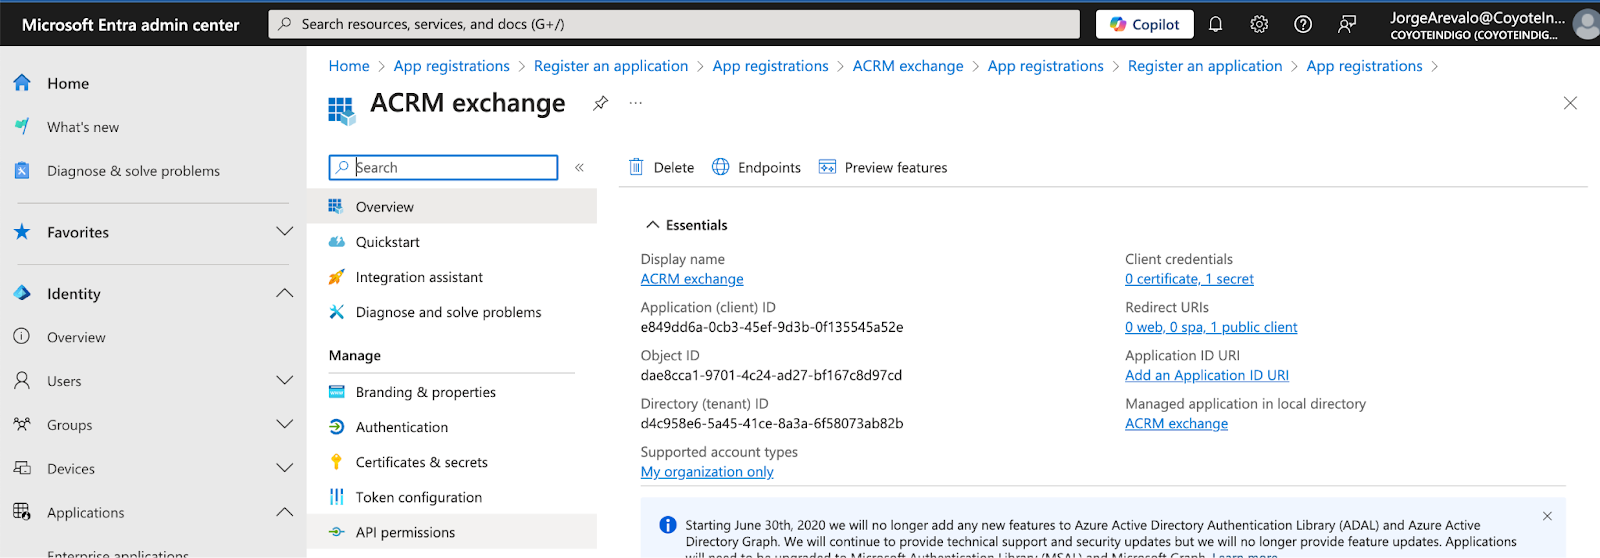
Save Application Details
-
On the next page, copy the Application (client) ID and Directory (tenant) ID. Save these for later use.
-
You can access this information anytime via: Identity → Applications → App Registrations → All Applications.
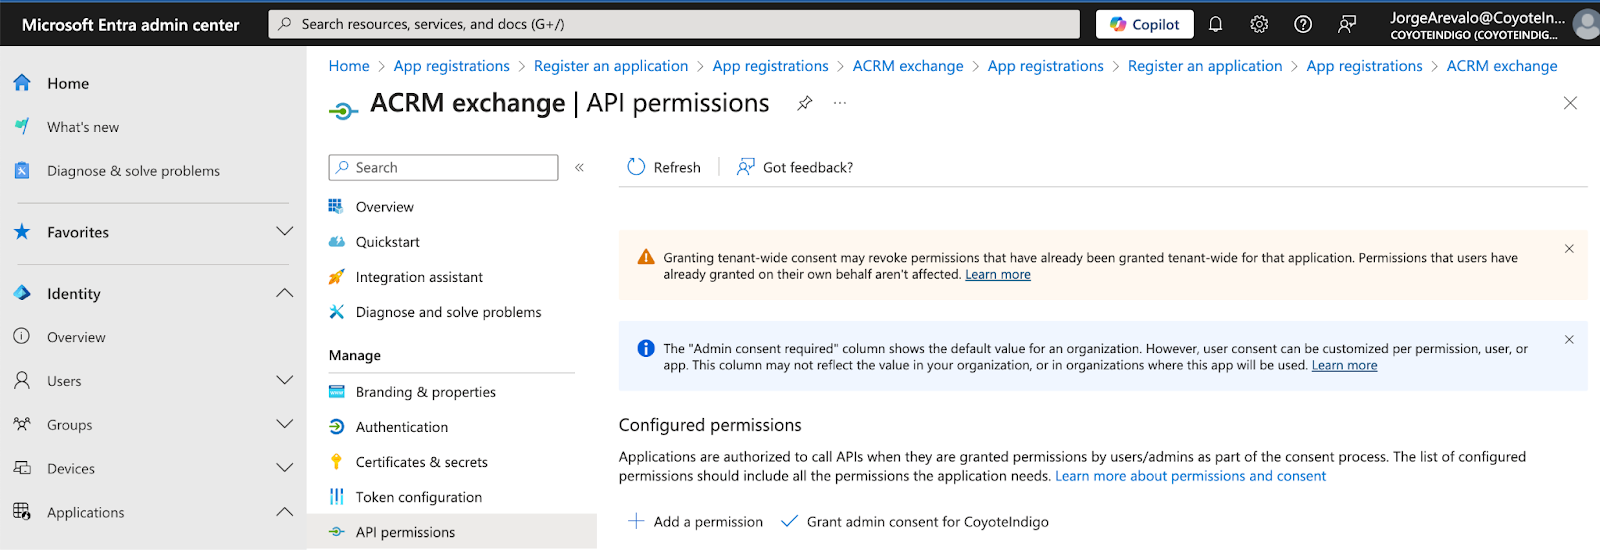
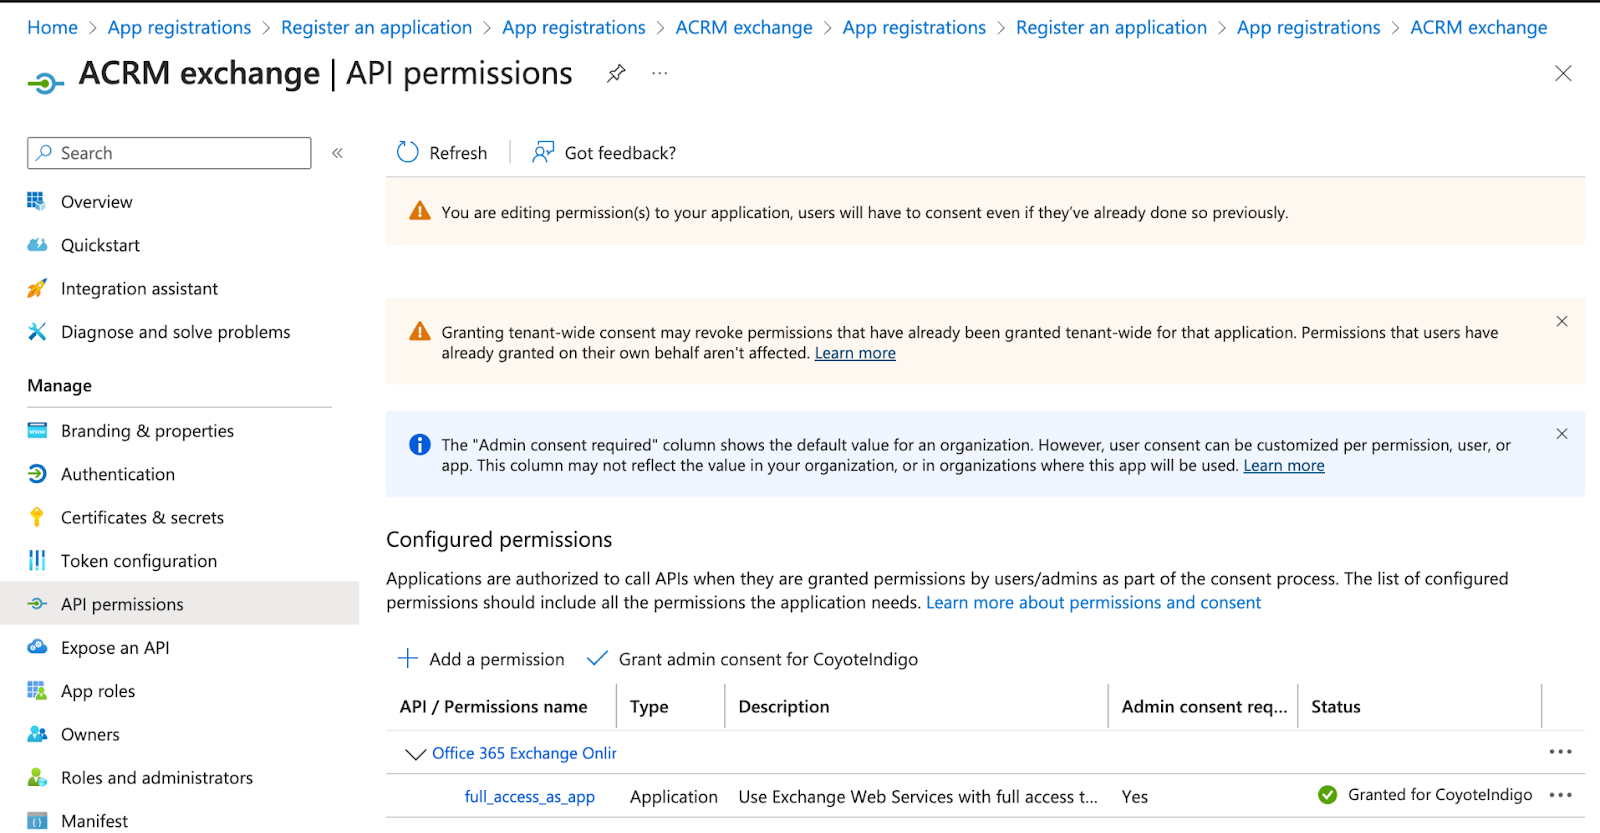
Step 2: Assign API Permissions
-
Go to API permissions → Add a permission.
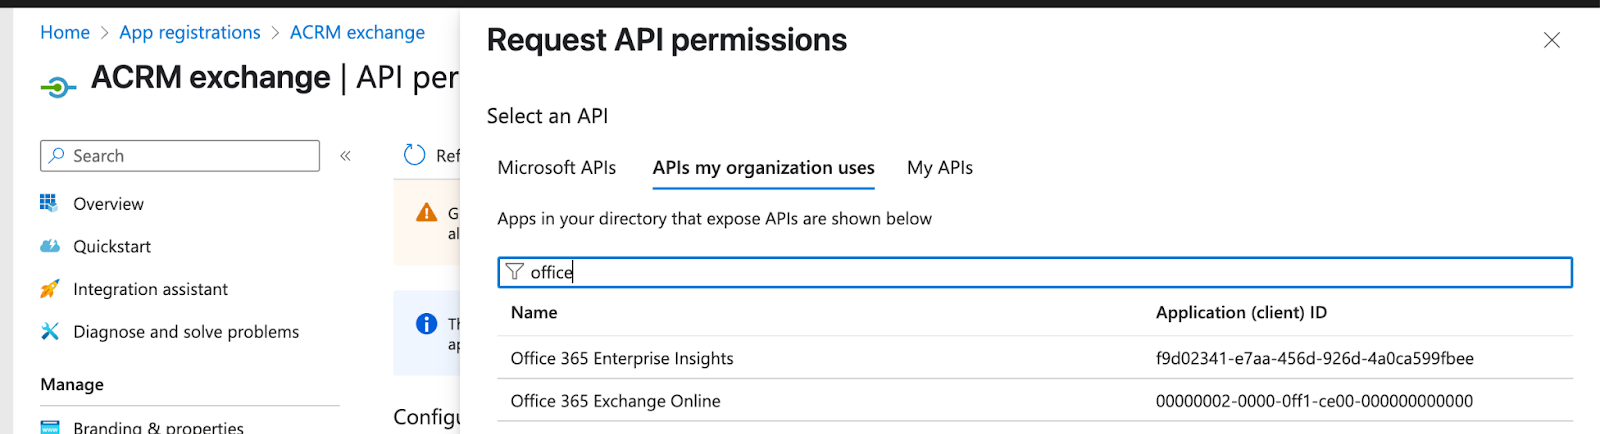
-
Go to the APIs my organization uses tab.
-
Search for and select Office 365 Exchange Online. (This option will appear only if the account has an active Office 365 subscription with Exchange.)
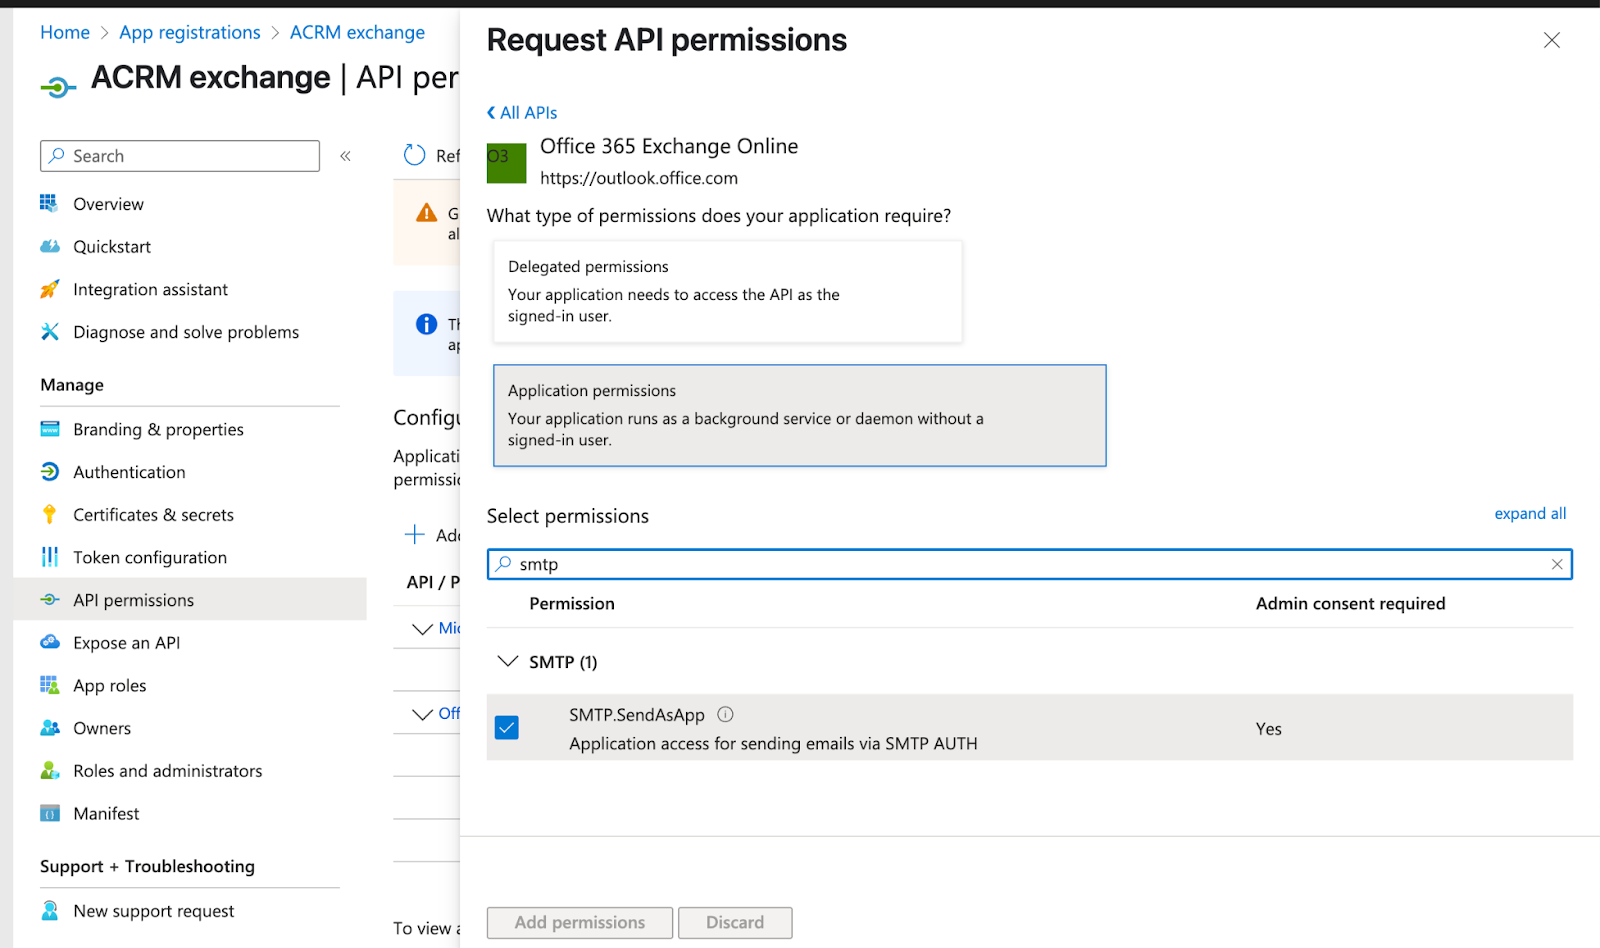
-
Search for Application permissions → SMTP.SendAsApp
-
Click Add permissions.
-
Grant admin consent by selecting Grant admin consent for and confirming the consent dialog.
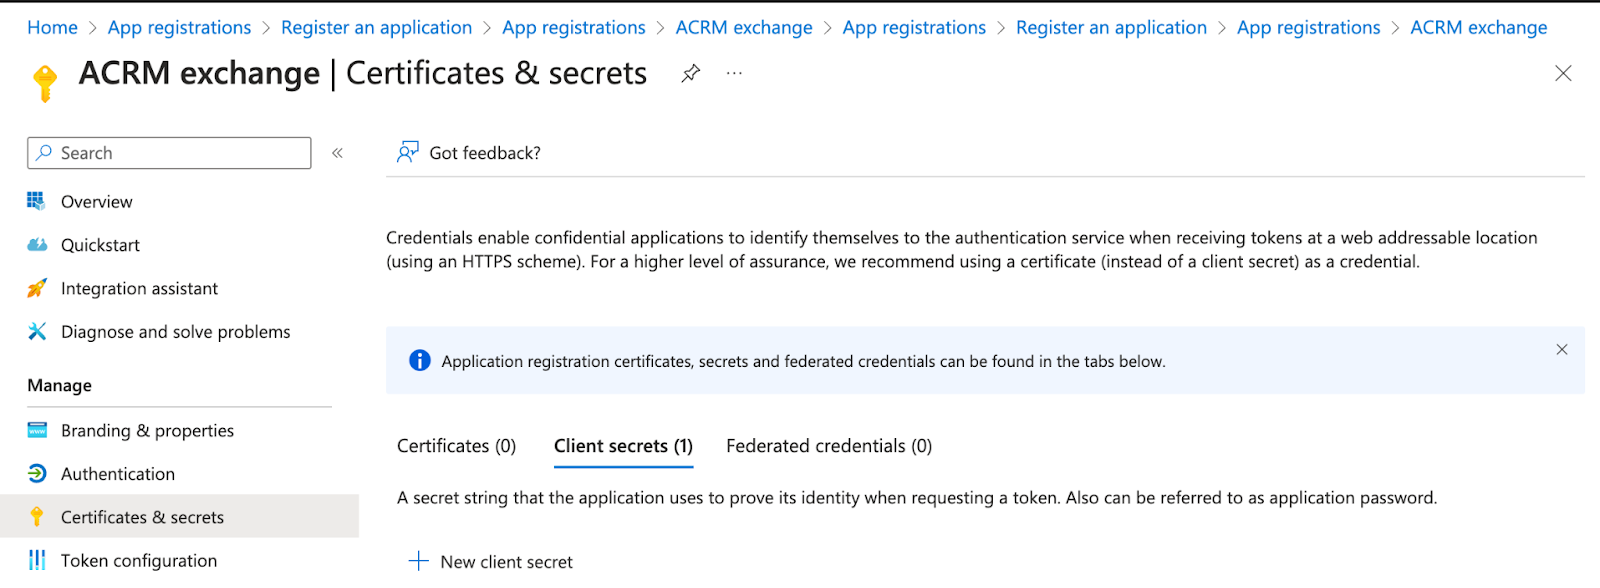
Step 3: Generate a Client Secret
-
Go to Certificates & Secrets → New client secret.
-
Enter description, choose expiration, and click Add.
-
Immediately copy and securely store the Client Secret.
-
IMPORTANT: Copy the value of the client secret and save it. Once you close this screen, you won’t be able to access it again. If lost, you will need to create a new client secret.
-
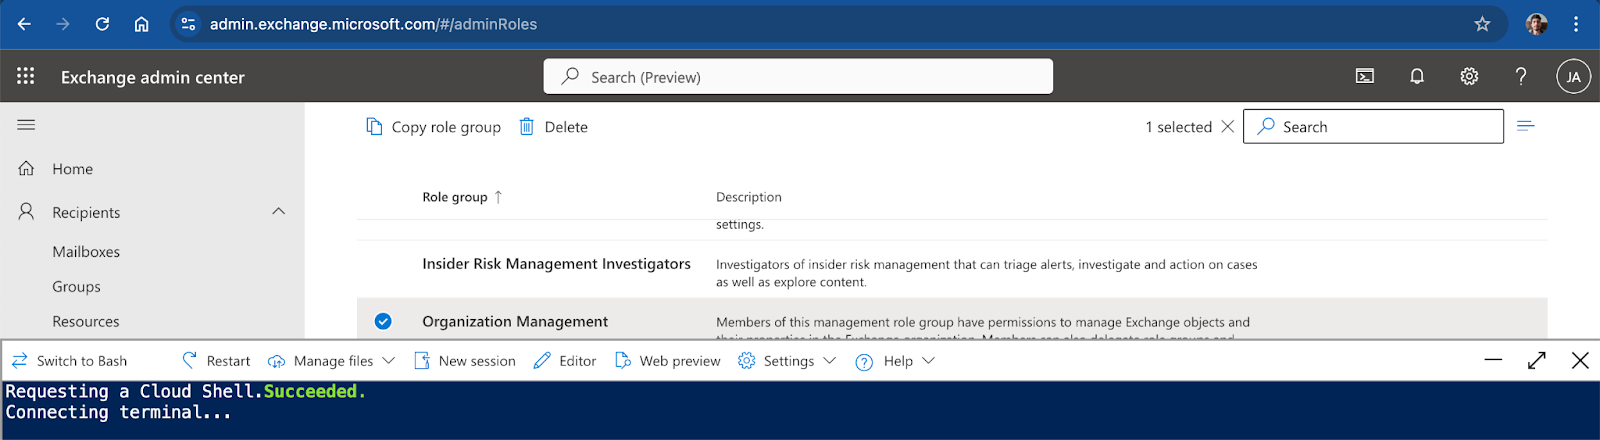
Step 4: Register the Service Principal with Exchange Online
The above steps enable the application to use the Exchange Online API. To grant access to specific mailboxes:
Use Microsoft 365 Cloud Shell (or Exchange Online PowerShell):
Connect-ExchangeOnline
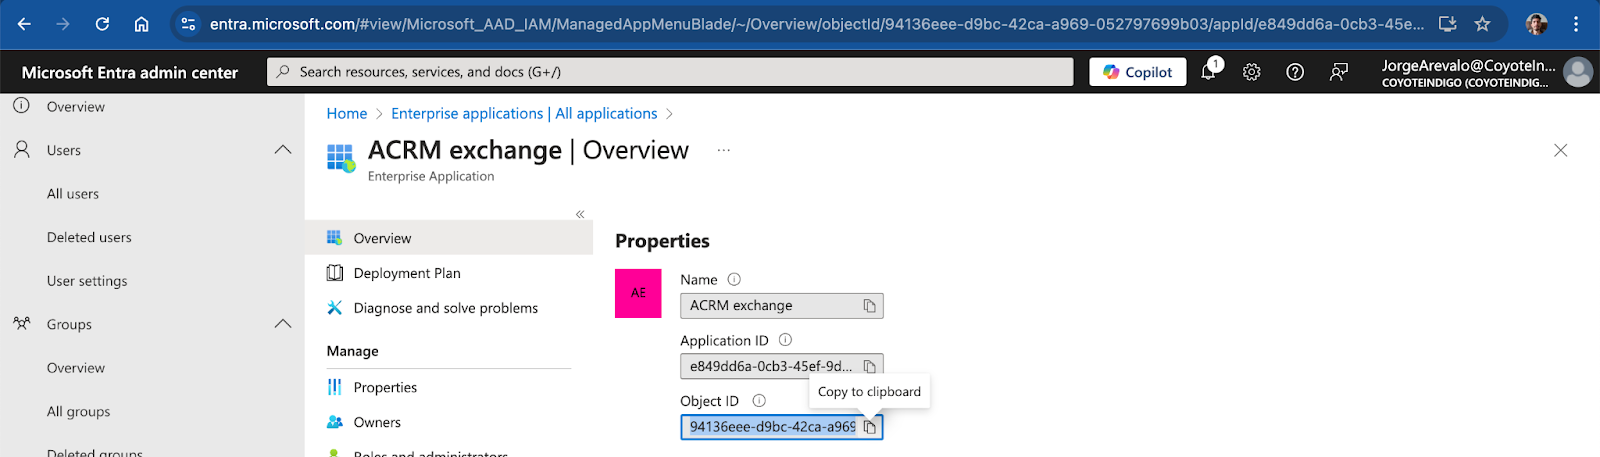
Retrieve the Application Object ID
-
Go to Azure → Enterprise applications and locate your application.
-
Copy the Application ID.
-
Copy the Object ID.
Create the Service Principal (if required)
The Application ID should sync automatically to Exchange Online as a Service Principal. However, in some cases, delays or issues with synchronization may prevent it from being recognized. If the commands below (Add-MailboxPermission) fails with an error like "Couldn't find a service principal with the following identity" create the service principal using this command:
New-ServicePrincipal -AppId <Application-ID> -ObjectId <Object-ID>
Replace <Application-ID> with the Application ID and <Object-ID> with the Object ID. This step ensures the Service Principal is properly registered with Exchange Online.
Step 5: Assign Mailbox Permissions (Critical Step)
-
Single sender:
Assign permission to system mailbox:
Add-MailboxPermission -Identity "mail_address_to_send_from_acrm@yourdomain.com" `
-User "<App Object-ID>" -AccessRights FullAccess
-
Multiple user senders:
Assign permission to each mailbox individually:
$mailboxes = @("user1@yourdomain.com", "user2@yourdomain.com") # Add users
foreach ($mbx in $mailboxes) {
Add-MailboxPermission -Identity $mbx `
-User "<App Object-ID>" -AccessRights FullAccess
}
Enable SMTP AUTH for Mailboxes
SMTP AUTH must be enabled on each mailbox you intend to send mail from using OAuth 2.0 with Exchange Online. This step is required even if you've granted mailbox permissions to the app registration.
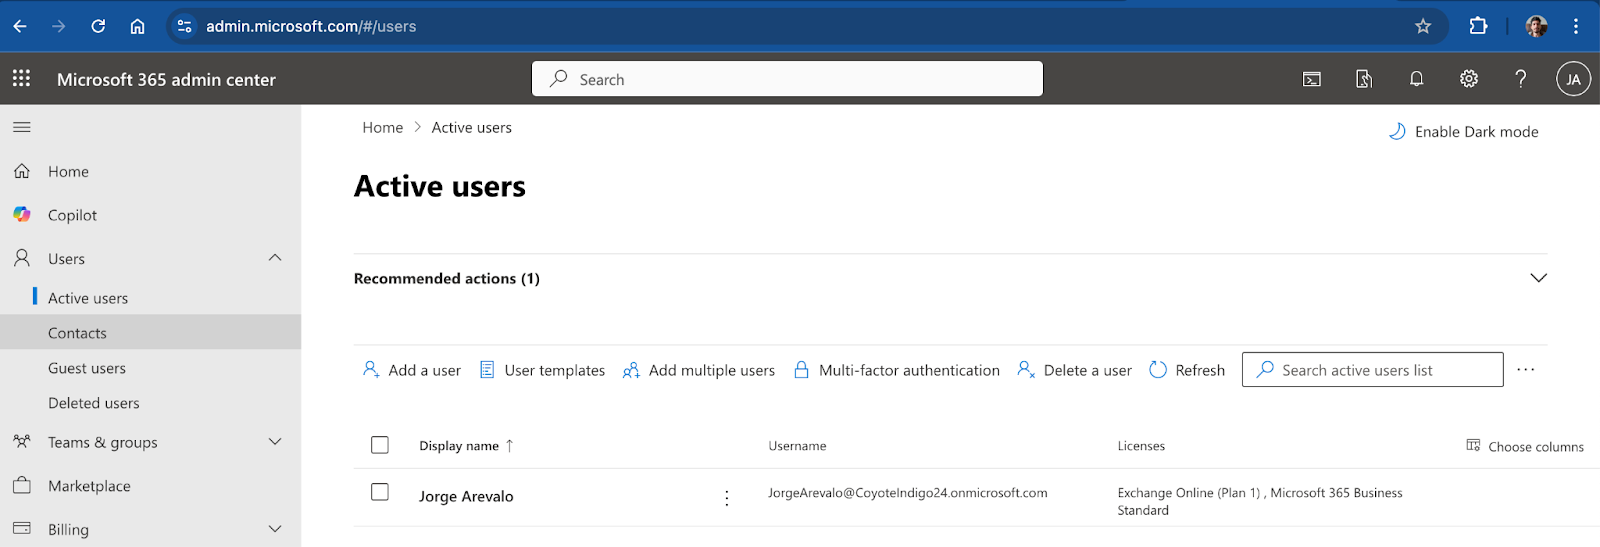
Microsoft 365 Admin Center Steps
-
Navigate to Users → Active users
-
Click the user whose mailbox will send emails
-
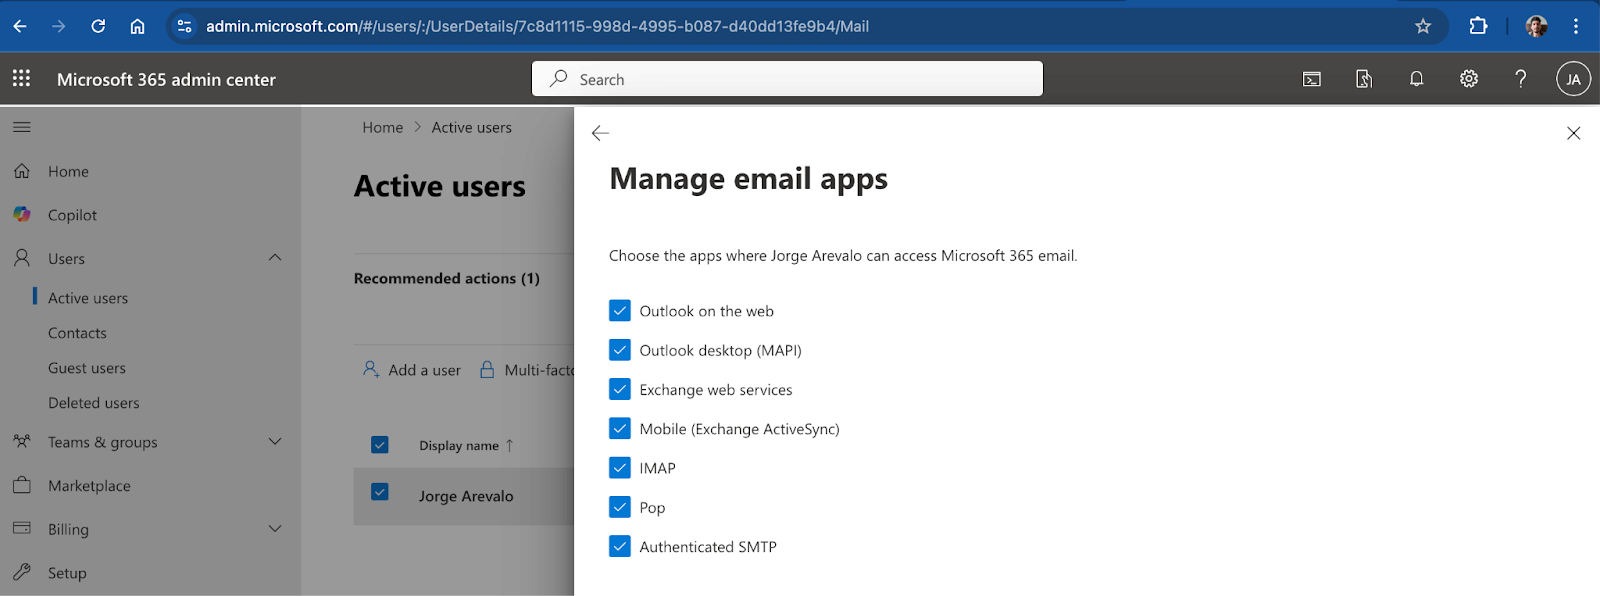
In the user flyout, select the Mail tab
-
Under Email apps, click Manage email apps
-
Ensure the checkbox for “Authenticated SMTP” is checked
-
If Authenticated SMTP is disabled, email delivery via SMTP will silently fail.
-

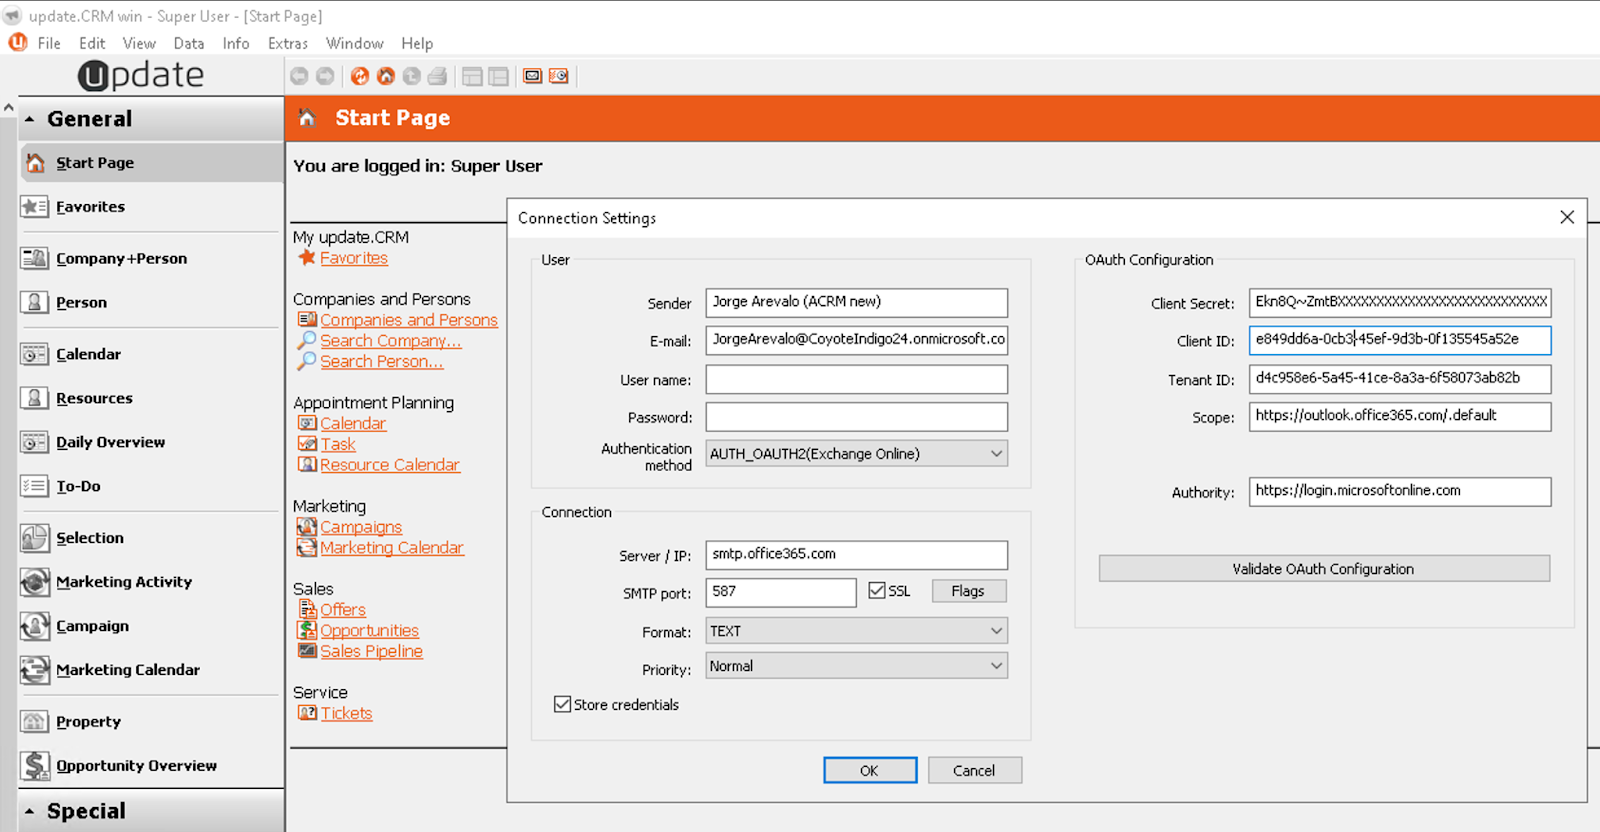
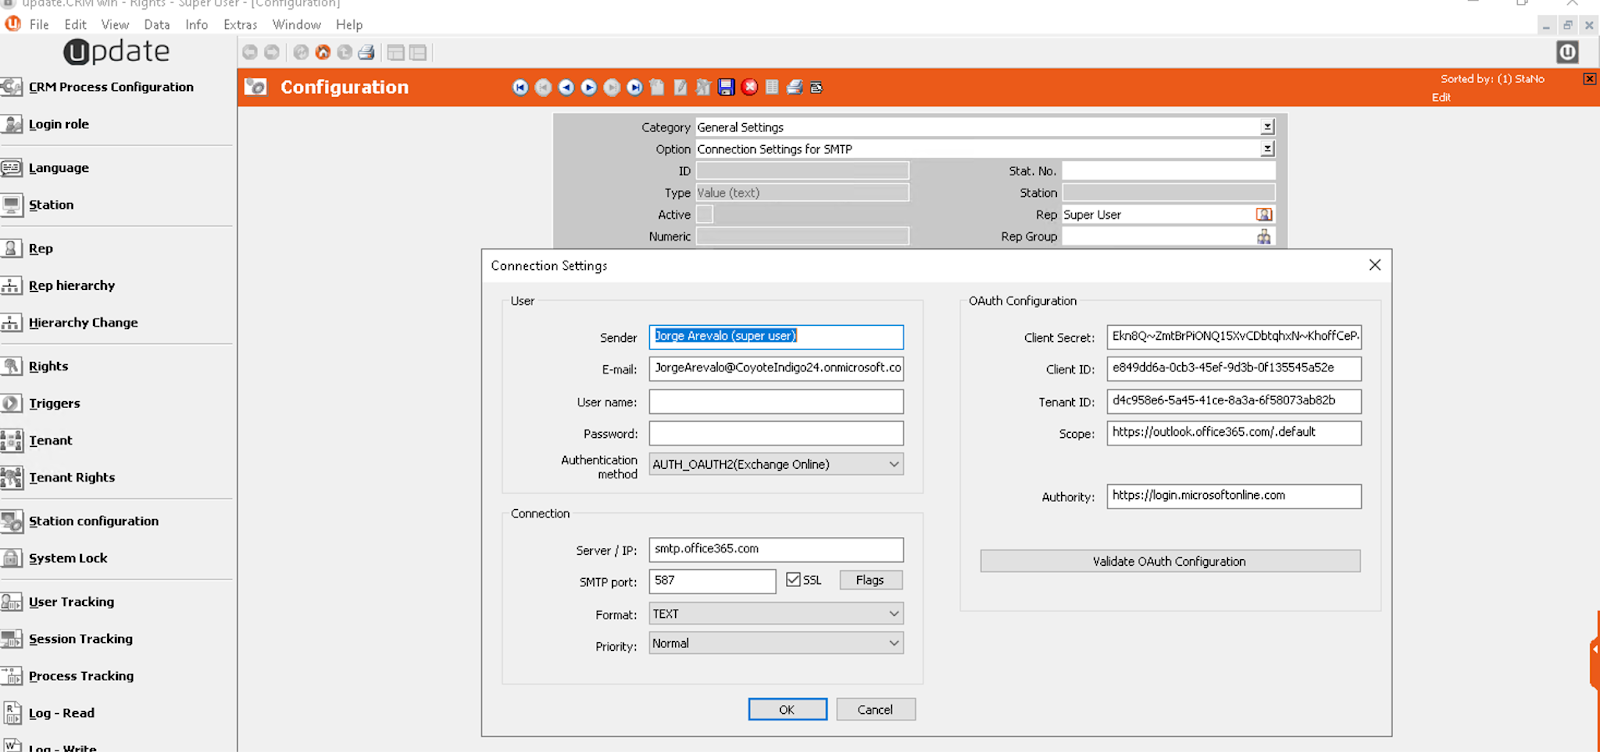
Aurea CRM Win32 (Desktop App) SMTP Setup
Step-by-Step Configuration:
-
Launch Aurea CRM mmba module and hold the SHIFT key while selecting File → E-mail.
-
In the dialog, choose authentication: AUTH_OAUTH2 (Exchange Online).
-
Fill the OAuth details from Azure:
-
Client ID in the Entra Admin panel, Enterprise Applications is the field Application ID
-
Tenant ID visible in the Entra Admin in basic information
-
Client Secret
-
Scope: https://outlook.office365.com/.default
-
Authority: https://login.microsoftonline.com
-
SMTP Host: smtp.office365.com
-
Port: 587
-
Enable SSL checked.
-
-
Check "Store credentials" to save your settings.
This creates a file:
<installation>\update.win\<ACRM username>\smtp.cfg
To apply settings to all users, copy this file to:
<installation>\update.win\system\smtp.cfg
⚠️ Important:
-
If a user-specific smtp.cfg exists in their folder (<install>\update.win\<username>\smtp.cfg), it will override the system-wide configuration.
-
This allows that user to send emails using their own address in the From field.
-
-
Remember: Hold SHIFT to access the SMTP settings screen.
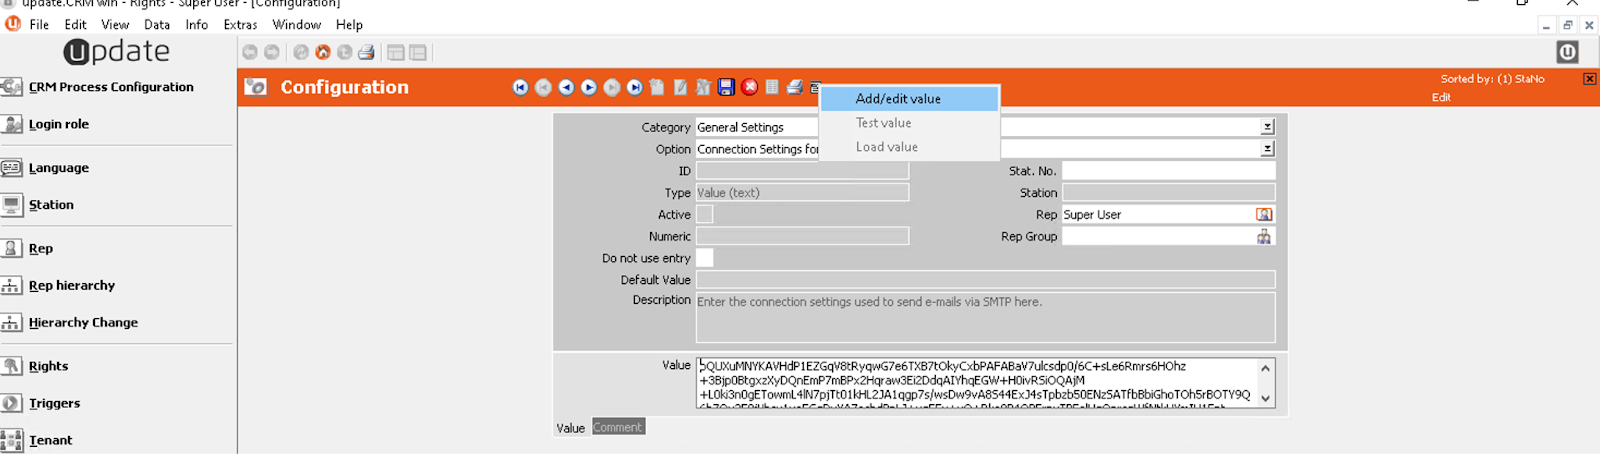
Alternative Setup via Rights Module
You can also configure SMTP from the Rights module, assigning different configurations per station, rep, or rep group.
Steps:
-
Open the Rights module.
-
Go to:
Configuration → General Settings → Connection Settings for SMTP -
Click Add/edit value.
-
The SMTP settings dialog will open.
-
Select AUTH_OAUTH2 (Exchange Online) as the authentication method.
-
Adjust any fields as needed and click OK.
-
Repeat for each rep, station, or group as required.
📝 This setup creates a separate config entry for each selection

Aurea CRM Web - SMTP Setup
To enable SMTP with OAuth2 in Aurea CRM Web, your web.config file must include the custom <oauthMailSettings> section. This enables secure, token-based email sending via Office 365.
If you're upgrading an existing installation:
Update web.config to include:
<configuration>
<configSections>
<section name="oauthMailSettings" type="update.Crm.Emails.MailSettingsSection, update.Crm"/>
</configSections>
<oauthMailSettings>
<smtp deliveryMethod="Network">
<network
host="smtp.office365.com"
port="587"
defaultCredentials="false"
enableSsl="true" />
<oauth
clientId="YOUR_CLIENT_ID"
clientSecret="YOUR_CLIENT_SECRET"
tenant="YOUR_TENANT_ID"
scope="https://outlook.office365.com/.default"
authority="https://login.microsoftonline.com" />
</smtp>
</oauthMailSettings>
<system.web>
<httpRuntime targetFramework="4.8" requestValidationMode="4.0" />
</system.web>
</configuration>
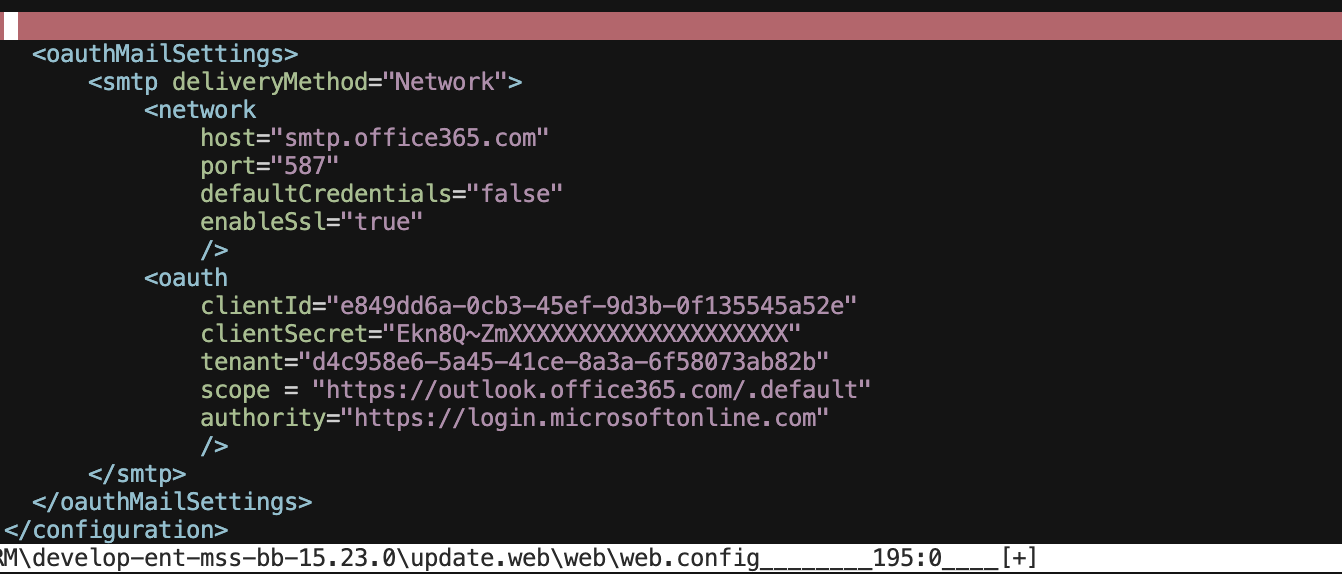
⚠️ Important Notes:
-
If both <oauthMailSettings> and <system.net><mailSettings> are present, OAuth2 will be used.
The legacy Basic Auth config is ignored unless the OAuth section is missing. -
Make sure targetFramework is set to 4.8. Older installations often default to 4.5, which is not compatible with the OAuth implementation.
-
Default sender is the logged-in user's email. The email address if taken from the REP info area
Behavior Differences: Basic Auth vs OAuth2
|
Aspect |
SMTP with Basic Auth |
SMTP with OAuth2 (client credentials) |
|
Authentication method |
Username + password |
Access token via client ID + secret |
|
Supported platforms |
CRM Win, CRM Web |
CRM Win 15.24+, CRM Web 15.24+ |
|
Sender in CRM Win |
Defined in smtp.cfg (system or per-user) |
Same — defined in smtp.cfg |
|
Sender in CRM Web |
Logged-in user |
Logged-in user |
|
Config location (CRM Win) |
smtp.cfg, mm.ini |
smtp.cfg (same mechanism) |
|
Config location (CRM Web) |
<mailSettings> in web.config |
<oauthMailSettings> in web.config |
|
Per-user override (CRM Win) |
Yes — user-specific smtp.cfg |
Yes — user-specific smtp.cfg |
|
System-wide config (CRM Win) |
Yes — shared smtp.cfg in update.win/system |
Same — shared smtp.cfg in update.win/system |
|
MAPI support |
Still available (separate feature) |
Still available (unchanged) |
|
EWS module |
Available for sync and CRM Web email |
Same — functionality remains unchanged |
|
Credential storage |
Password stored encrypted |
Client secret stored encrypted (same mechanism) |
Troubleshooting Common Issues
|
Issue |
Solution |
|
OAuth Configuration Errors |
|
|
Token expiration/failures |
|
|
Email sending fails (unauthorized) |
|
|
Old config still active |
|
|
SMTP settings not saving (CRM Win) |
|
|
Validation fails in CRM Win |
|
|
CRM Web doesn’t start |
|
|
Email silently fails |
|
Harry Tasker
Comments